
 1-16 hours • Beginner • 0-200
Greenhouse season typically begins in the spring and can last throughout the fall. Depending on the weather where you live, you may need to dismantle and rebuild the greenhouse each year. At the very least, the beginning of the growing season requires an annual clean up in preparation for your plantings. This usually takes place while you’re waiting for the ground to thaw or are mucking around in rain boots.
Moving your greenhouse indoors gives you a jump on the season by allowing you to plant earlier. In fact, under the right conditions you can grow herbs and lettuce throughout the winter or force bulbs to come to life before their natural cycle. Most often, though, the indoor greenhouse is used as a way to get your seed starts well underway before the outdoor greenhouse is ready for business.
Step 1 – Understand How it Works
The job of a greenhouse is to trap heat inside where the plants are. Outdoors, that means allowing sun to enter through walls of glass, warming the inside during the day. At night, the glass holds the warmth inside. In addition to warmth, the system provides light. Moisture is another key element, which is created by the plastic covering and the control of airflow.
In an indoor environment, plastic sheeting or other lid acts as the greenhouse roof, holding in moisture and heat. A variety of objects can work for the indoor greenhouse, so take an inventory of what you have on hand for inexpensive mini-greenhouse options.
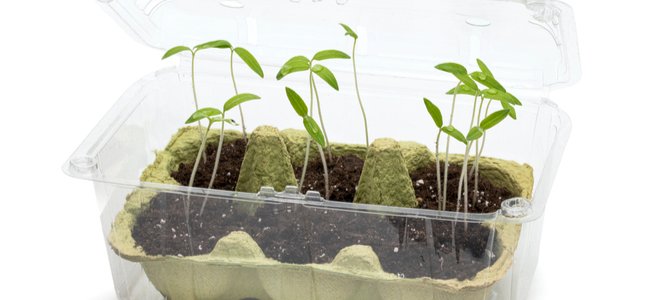
Step 2 – Find Planting Containers
Your greenhouse is simply a place for the growth to begin so remember you can move to larger pots or replant into the ground when the outdoor weather cooperates. It’s okay to start quite small.
Egg cartons are neatly separated and are easy to fill with soil and seeds. Just put the carton on plastic or a tray to protect the surface below from water damage. Yogurt containers, baby food jars, and clear salsa containers are up to the task too.
Step 3 – Prep and Fill
Start with clean containers. Press some soil into the bottom and place the proper amount of seeds in each one. Cover as directed and water. Use the same procedure for small plants and bulbs.
Step 4 – Cover
Plastic to-go containers make a ready-made mini greenhouse. Use the bottom of rotisserie-chicken containers or salad containers and simply put the lid back on after planting. If using egg cartons, cover using plastic wrap. Plastic bags can also do the job. Tent them over the containers, using a wooden skewer for support on the inside if needed. Then tuck the opening of the bags underneath the container’s base.
Step 5 – Placement

Find a sunny east or south-facing window for your plants. They’ll need a lot of direct sunlight and the heat it brings. If your window ledge isn’t big enough for the task, place a card table or other surface in the area.
If you don’t have adequate natural light, you may need to place your plants beneath artificial light. Grow lamps allow you to place your plants anywhere, even a closet or the basement. Just be sure to use a reliable timer for consistent light and dark periods.
Step 6 – Create a Watering Schedule
Regardless of what you decide to plant, you’ll need to maintain a regular watering schedule. For something like succulents, it will be less frequent than vegetables. Your container will also influence the amount of watering required. For example, egg cartons are very shallow, so the soil can dry out quickly. Containers with deeper soil will require watering less frequently. You can even set up an auto-water drip system for convenience and consistency.
Step 7 – Build an Upgrade
Once you have the process mastered, you can build a larger greenhouse for inside the house. It can be made from a plastic closet with free-standing shelving inside. You can also hang plants from a clothing rod system inside a plastic covering. If you have some old glass windows around, connect them into a box for another option. If you really want to flex your DIY skills, you can build a wood box with glass inserts for the sides. Put a hinge on the top to access the plants.
From simple egg carton to formal structure, creating an indoor greenhouse is a rewarding project for any skill level.
Source link : https://www.doityourself.com/stry/how-to-make-an-indoor-greenhouse


")


